Showing posts with label Halloween wall-hanging. Show all posts

Thursday, September 28, 2023

The Boo Do Special

Look at your fabrics and see how they interact with each other.  When shopping for fabrics for this type of wall hanging, keep in mind what you need for good background, foreground, skulls, teeth, and eyes.  I have a few special fabrics, I was fortunate to find, that work in a way that other fabrics don't seem to.  This wild dark blue and white fabric, that I want to call a plaid, is one of them.  It is kind of a wavy grid pattern.

I have used it a lot, in the past couple of years, to make my skull designs really stand out.  It is great for the background and for the mouth.  I use a rustic sort of white fabric, as the skull, so the white is not glaring or clean looking.  I made my own skull pattern, by attempting to draw a peanut shape.  I keep all my patterns in a binder, so I can locate them when I want to use them again.  If you draw a shape, then decide it is too small or too big, just resize it on your copy machine, or draw more lines inside or outside of the existing shape.  
I like the wonkiness of my skull pattern, as I can flip it one way or the other and have it a little different, instead of cookie cutter skulls.  I fussy-cut the teeth and ghetto applique them onto the skull part.  Of course, everyone knows that when doing applique on a Halloween project, you must use Stitch-Witchery to hold the pieces in place, while you sew. 
I don't like scary skeletons or skulls, so I like using large flower prints, or something similar, for the eyes.  I have several good prints that work very well for this.  

Because I am making a wall-hanging for my hairdresser, I got this crazy idea about making something with a "Boo do".  I decided I needed to put a "do" on one of my skulls, as the focal point.  I used my existing skull pattern to help me draw the right size of hair to place over it.  I just drew some spikes!  Then I had to think about the right fabric for the hair.  Hmmmmmm?  A dash of purple?  Lightbulb!  I have some amazing fabric that I ordered years ago, to use in my daughters' Doctor Who quilt.  I have some scraps of that.  I dragged that out and pressed it, then fussy cut an area that I thought would look good.  It does!

The plaid/grid background, above, will not work on this, as the hair fabric changes the dynamics.  I had to go for the darker solidish fabric.  I already had two flower-circles fussy-cut from a previous project, so I just used them.  This is so shaping up!
The design wall has not been this clear in some time.  This block is approximately 9.5 by 12 inches.
Then, I took some strips out of my spooky stash and tried them around the central block.  I cut a couple strips, so I could audition how it looks.  I want orange strips around the black to make it pop.  I want something in a couple of the corners to ease the background of the skull.  Since it is for my hairdresser, I decided to add some scissor fabric in one of the corners.  I have lots of different scissors prints, and one just happens to be black and white.  Then my gray fabric with skulls and ghosts also has the word "Boo" on it.  I fussy cut that out to make the "Boo do" part, then decided it looks rather like a poster or add, so I am adding the word "special" underneath.  If Teresa were here, she would tell me that I misspelled it. 
Only the central orange section is sewed at this time, the rest is merely clinging around it on my design wall.  All I need to do, is finish sewing those strips around it.   I do like the direction this has taken.  Notice the scissors fabric, please.  It really fit in.

I "do" like the deer-in-the-headlights look.  Here you can see how this skull differs from the others.  The hanging in the background is the one I did last year.   I hope you embark on your own adventure in creating a wall-hanging.  

Sunday, November 6, 2022

Quilting Retreat in Cascade

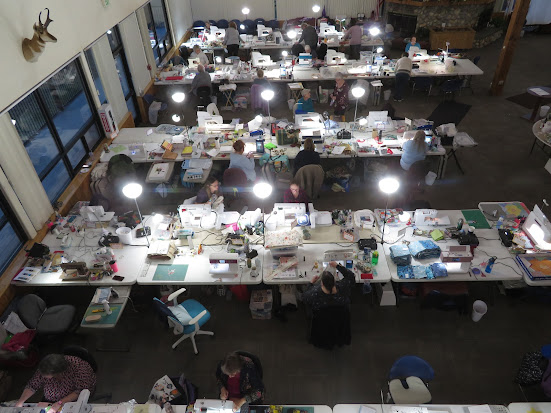
On October 27, A and I drove up to Cascade with our sewing machines, rotary cutters, and our projects.  We had not been to this location before.  It was at Trinity Pines camp.  They sure had plenty of room!  They had a lovely view and it was snowing when we arrived.  I got to sit next to A and across from a couple other quilters that I knew.  We met some folks we had sewed with last year, when the retreat was at the Ashley Inn.

This photo shows the view of the mountains out our window.  This huge room had windows on three sides!  I shot this over the top of my machine (which is not in the photo).  That is Shannan's embroidery machine in the photo.  I counted 14 embroidery machines at our retreat.  I prefer doing my own thing.

Speaking of "my own thing," above is the beginnings of my shark quilt.  I love those shark fabrics!
This is a view of the great outdoors, from the safety of the covered balcony that wraps around that huge room we were all sewing in.
This is the view from our cabin, as the sun came up on Thursday.  Our cabin has three bedrooms down-stairs and two up-stairs.  Each bedroom has it's own "on-suite."  On-suite means bathroom.  A and I shared a bedroom. 
This view is from up in the balcony, inside that huge room.  We had a gal giving chair massages up there.  She was very good.  Each of has had a six-foot table to spread out on.  My table is the one in the lower left with the empty blue and white swivel chair.  You can see A to my right, working away, and Shannan and Marie across from us. 
After I finished my shark quilt top, I started on my Halloween wall-hanging.  I did not get it finished before our fun time was over.
We drove back to our valley on Sunday, Oct 30.  I did finish my Halloween wall-hanging on November 2nd.  
Tada!  It is done in time for next year!

Friday, October 30, 2020

Halloween Wall Hanging

      I have some fabrics left in my scrap bin by T.  She did a few Halloween quilts.  I made a wall-hanging for my daughter, about three years ago, and it turned out pretty cute, from being made with T's Scraps.  I have used those scraps again, plus a couple new Halloween fabrics I picked up this fall.  Annita and I went over to JK Quilters on Ustick Road, and they had some amazing Halloween Fabrics.  The center of this wall-hanging is a square that was left by T in my scrap bin.  I started with it and then grew the quilt around it.  When I quilted it on my Viking (can you spell Husqvarna?) sewing machine, I used my walking foot and went around the words "Happy Halloween" in black thread.  It made it stand out nicely.  The rest is stitch-in-the-ditch, which rhymes with witch, of which there are none in this quilted wall-hanging.  
     When we went on our last camping trip of the year, I started piecing some Halloween blocks for a whole Halloween quilt.  Below is a photo, of my first three blocks.  We were at the Bruno Sand Dunes State Park.  I based them on the outcome of the wall-hanging.  I was the only one at camp that was outside sewing for hours, just a few feet from the camp fire.  I take my Necchi camping and get a spot with power, or my husband brings solar panels.  I had lots of fun and ended up in the middle of nowhere (really!) while trying to find the Bruno Canyon Overlook (the road was not on the map, but the overlook was).

Me practicing social distancing.