 |
| This one was coming into the Nampa yard last Sunday. |

Wednesday, December 31, 2014
Happy New Year!
I did a lot of stuff this year. I think I completed 10 quilts. I have two that I have not posted the photos of yet; I need to get them off my camera. I had surgery on my foot, took a short vacation to Seattle last August, one trip up the river last summer, went wading in Big Rattlesnake Creek, ate watermelon, cleared a few things out of the house, painted the dining room wall, took on a kitty sitting job for six to seven months, took a few barn photos and a couple train photos in the snow. For Christmas, I got a new sewing chair! I am making a commitment to get at least four UFO's completed in 2015. Happy New Year!
Saturday, December 27, 2014
Rustic Crazy Snowmen Wallhanging!
Someone wants to know why I made so many bags in 2014. Between the big quilt projects, I like to do quick and easy projects to get that instant gratification. There is no instant gratification in making quilts. It is exciting to shop for fabric, to choose out of your stash which fabrics go together, getting the top all pieced, and then when it is done, but it takes awhile to get through the entire process. I think that is what turns a lot of people off to quilting. It takes a lot of time, but the end result is fabulous! I love it. I have finished my rustic snowman wallhanging! Yeah. These can also be rather instant gratification projects, if you get down and stay with it for a week. This one is 20' X 20' and is hanging on a stick, as described in a post I did last July 25, 2014. I think I put more red into it than I thought, but I love it!
 |
| The one on the upper right's name is Curly Joe. |
Sunday, December 21, 2014
The Year in Bags
I have mailed out all my Christmas greetings and have everything I need to make some most excellent fudge. We've cleaned out a few things, rearranged a tad, and bought a couple new things. This year I made snack bags for a number of folks including all the ladies in the Cloverdale Ladies Society. Below are photos of all the bags I made this year (and a couple of pillow cases, thrown in for good measure). I made ten bags. Some of them got a little out of hand on the size for snack bags . . .you could get a full sized bag of Doritos in a couple of these bags! The second photo down shows both sides of the same bag; the one I made for Elverta. You can see the Laurel Birch elephants on one side of that bag and Laurel Birch kitties on the other side. It was an excellent year for making bags!


Tuesday, December 9, 2014
All the Cute Laurel Birch Elephants
All the cute Laurel Birch elephants are on the back of this baby quilt now. This view is of the new front, which was formerly the back of the quilt. The new name of the quilt is: Modern Baby Quilt.
 The moral is: Always look carefully at your Friction Pen, to make sure it is really a Friction Pen and not a Bic permanent marker, or your elephants and borders will have permanent blue lines on them.
Sunday, November 30, 2014
Knotty Quilters November Retreat
This is how it looked outside my house on the first day (Nov 14) I traveled to the retreat in Eagle, Idaho. That's my lavender garden covered in snow.
 I left around 10:30 a.m. and got there at 11:30, in time to save the two, who had made it before me, from sure starvation. We had a fine little lunch and then Mary took a nap on the couch and I took a snooze in the chair in front of the stove, while Marsha took photos of us sleeping. Around 1:30 I started cutting flannel to make a flannel rag quilt. Others arrived later in the day and more joined us on Saturday and Sunday. Sunday morning, Colette and I both had our rag quilts finished! Then we all worked on car blocks for a group wall hanging project.
 |
| Colette made the Spidey quilt, on the left, for her son. I made the Autumn Kitty quilt, on the right, just for fun! |
 |
| My angry monster robot, on the left, morphed into a "Friends fur ever" puppy mobile. |
Thursday, November 20, 2014
We Lose Friends.
My good friend, Betty Finnegan, passed away suddenly last Sunday, November 16. I've never had a close friend die before. It is hard to think that anything is worthwhile, when you lose someone forever. Those of us who knew her are very fortunate to have wonderful memories of her. Memories are magical things.


Saturday, November 15, 2014
Inspiration from one another (snowmen!)
Being around other quilters and doing things with other quilters causes a chain of creative events that are immeasurable. I have a friend that I like to do things with, and we are both quilters. I was out of my favorite strawberry rhubarb jam, that can only be obtained at Cliff's Country Market in Caldwell. Also, I needed to pick-up a gluten free apple pie. Cliff's has the best, no. 1, gluten free apple pie in their frozen GF section.
We drove over to Cliff's and got yummy things. Then I thought why not stop in a quilt shop while we are in the neighborhood? We did. She behaved, but I had to buy some fabric. While we were there, another quilter came in and was asking advice on a small quilt she was working on. I loved it! It was delightful and simple in design. My friend and I, headed for the nearest best Mexican restaurant, where we drew the design out on a hastily found piece of scrap paper.
A few weeks later, my same friend and I planned a trip to Weiser to visit Judy Ann's Quilt Shop. What fun we had. Her niece was running the store, when we got there, at 3:00 in the afternoon. Such nice fabrics, most of which we had not seen down in the valley. I spent all my mad money! I got two different snowflake fabrics. I found some awesome 50's car hop fabric, and I bought enough to make the front and back of a quilt for my cousin. Such a nice time we had.
That evening I took out that piece of scrap paper and went through my fru-fru quilting fabric and scraps and pieced that entire wall hanging. It took me Monday and Tuesday evenings to sew on the snow man faces; five of them. I got the "Fru-fru Snowmen" wall hanging completely quilted and bound by Friday evening, November 7.
Yesterday, I surprised my friend with this darling snowman wall hanging at our "Cindy's Retreat" yesterday afternoon. I am getting ready to head back there in a few minutes. I, and even my mother, think it turned out well, even though I used the non-winter fabrics on it. I sewed the binding on the backside, then turned it to the front and machine stitched it in place with a snowflake stitch!
 |
| This is so cheery! |
Friday, November 7, 2014
First Liberated Church of Hopscotch
I did make my church block for my liberated houses quilt. But I did not make it with a blue sky.
 I think it came out a bit small compared to the other 19 liberated house blocks I have made. I may make another one, but if I make the house bigger I can't put all those crosses in the yard. I believe this church has a grave yard! It certainly has lots of angels.
I got the wild crosses fabric at Hancocks, and the blue stripe roof fabric. The hopscotch fabric, I picked up years ago at Joanne's. Perfect for church windows!
I got the wild crosses fabric at Hancocks, and the blue stripe roof fabric. The hopscotch fabric, I picked up years ago at Joanne's. Perfect for church windows!
Saturday, November 1, 2014
Three Projects Finished Last Weekend!
Last weekend I had the most fun! I can't remember what I did Saturday morning, but my friend, Teresa, came over in the afternoon and we did a quilted pot holder project. What I like is that no matter how easy the project, I always learn something new! How does that happen? I remember that I learned two new things, but now (nearly a week later) I can only remember one of them. Hmm. Maybe if I look at that pot holder, I will remember!
We made the Folded Pot Holder, from Quilt Expressions blog.


 |
Here is the finished kitty quilt with some of the same binding as the pot holder. |
Thursday, October 30, 2014
My Two Favorite Quilt Books
Someone wanted to know about my favorite quilt books. I was brain dead that day and could not tell her the titles. I am getting quite old and forgetful, although, how I can forget Freddy Moran is beyond me. She is the most colorful person I never met!
Anyway, Quilting and Color Made Easy, by Susan McKelvey and Janet Wickell, published by Rodale, Inc. is my first favorite book on quilting. It has the most overall coverage of techniques for quilting. It discusses batting, fabrics, everything you need to know about color. It is easy to understand, it is a thorough but not huge book. It is to the point and I have read it completely through once and revisited it a lot. The photos are informative and colorful, it covers different forms of applique, whether to use a steam or dry iron, and the list goes on. It has a fabulous index. Any book with a good size index has got to be good!
My other most favorite quilting book is not of the technical kind, but the creative kind. It is called Collaborative Quilting, by Freddy Moran and Gwen Marston, published by Sterling Publishing Co., Inc. I love it for all the wild inspiration and beautiful quilts. I like how they are each introduced separately; showing their different styles. I like the idea of a "Parts Department", because it turns out that I have one! It tells you how to make all the different blocks, and they are Liberated Blocks! I really like that! There is an entire section showing the quilts they have made, and what blocks you make to construct a similar quilt. Freddy Moran's color theory is: 10 prints don't work, but 100 do, excess is never enough, pure color works, and black and white makes it alright. It is an awesome idea book, for quilters who love to mix it up, or need permission to do so.
Monday, October 20, 2014
Hideous Fabric Traveling Quilt
I did get my Sunset Sail quilt back from the long-arm quilter's a week ago. I have to put the binding on. I got my Japanese quilt top completed and need to get the backing done. After that the next project up is the hideous challenge fabric blocks that the Knotty Quilters made, oh, a year-and-a-half ago. Then they gave the blocks to me to put into a quilt top. Photos of those should be posted in the next few weeks. That fabric is truly hideous, but the blocks that have been made are truly fabulous.
 |
| The Knotty Quilters all agreed this is hideous fabric, so we split it up and made whatever blocks we wanted out of it to go in a traveling quilt. |
Sunday, October 19, 2014
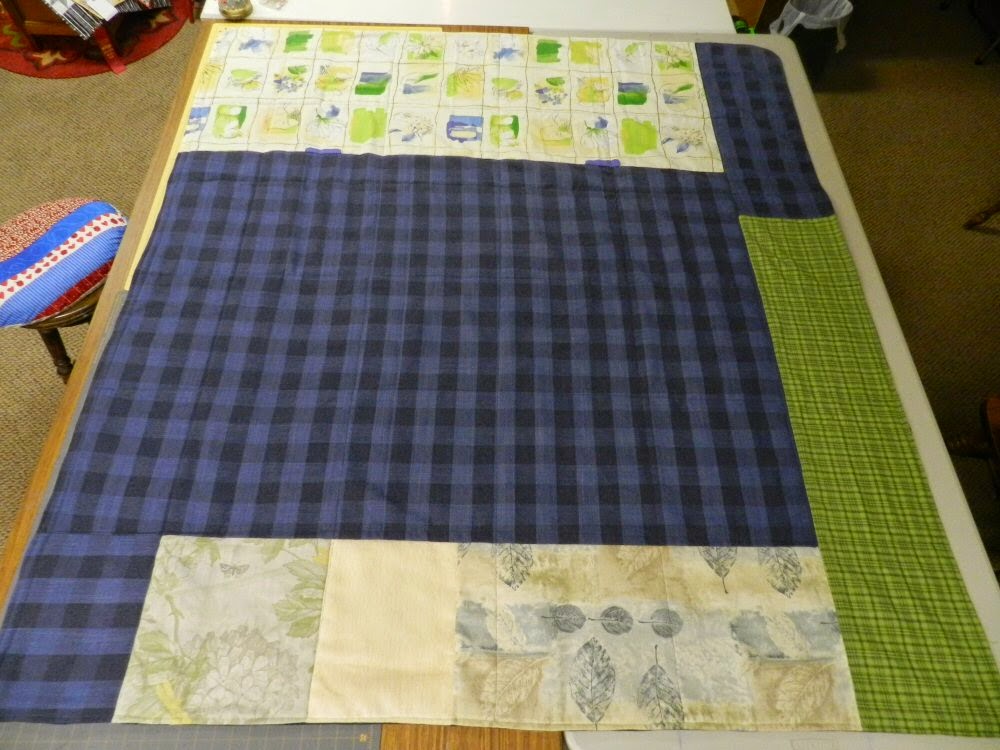
Pete's Roughin' It Quilt
Over the years, I have made three quilts for my husband. He recently told me that he wanted another quilt. This one was something I should not take much care or thought in making, as he just wants one to toss in the back seat of his pick-up. I have been trying to use up some of my stash, as of late, so I drug out my drapery fabric remnants and found the two fleece blankets that I had been moving from one place to another. One of the fleece blankets turned out to be a sweatshirt fabric blanket, but I used them both for the backing. I folded the fleece blanket and sewed the folded edge to the edge of the sweatshirt fabric blanket. That seam was a little bulky, sew I sewed it down. I used big chunks of drapery fabric remnants for the top. I had a lot of this dark blue plaid, that I had used to make drapes for my Dad's room just a few months before he passed away. I don't know what kind of fabric it is, but it is sturdy and hangs really well. I determined that the fabrics I was using was going to make this a heavy quilt indeed, so I decided not to put any batting in the middle. I cut the back to the same size as the top, then sewed them right-sides together, leaving a place to turn it right-side-out. I smoothed it out on my table and pinned it all around the edge and top-stitched it all around and across the opening. This made for less bulky edges. Then I got the chalk line from the wood shop and my husband helped me snap lines both directions on the quilt back and I quilted on those lines. The reason for quilting it with the back facing up, is because it is stretchy and I wanted the non-stretchy side down for better control. That worked really well. The quilting resulted in blocks of approx. 11" square, which is okay because there is no batting inside to shift. It is plenty heavy and soft and warm due to the properties of the thick sweatshirt fabric and the fleece used on the back. After I sewed on the chalk lines, I used the lint remover to take off any excess chalk. After I finished the quilt, I cleaned my machine, to remove some chalk and lint that had been building up for a couple months. This was a quick quilt that has no binding, and it went together fast and without fuss. I can tell, already, my husband is attached to this one as much as the others I have made, despite it's total scrappyness.
 |
| This is the first time I used the chalk line, did it just to make it go faster. |
Tuesday, October 7, 2014
Liberated House Blocks
I have made a little progress on the Liberated House Blocks. I completed one in September and I completed one this evening, that I started last Friday. I call it the Tropics Lounge block. There is a fire truck parked outside. There is only one fireman in the truck, so I presume the others are in the Tropics Café and Lounge, where that hot babe is. The fireman is a bear, naturally!
 I have 18 blocks completed. I need two more blue sky blocks, one of which will be the park and the other will be the church block. I think twenty blocks should be enough, since I will be putting sashing between them that will represent streets. Oh, but darn, I have some mud demo derby space aliens that I wanted to include . . . might have to do another row to expand the township. I am planning railroad tracks in the border along the bottom and a bit of forest along the top. I had also considered a Physical Therapy practice called Simon's PT. I have been going to PT again and it seems all they ever say is "Hmmm do some of these stretches and hold for ten seconds each, and do thirty repetitions." Then you do it like Simon Says. Actually, I really like my physical therapists. Also, I believe PT is helping my condition. I have to be good and get better so I can do more quilting! Oh, and practicing my violin! Of course!
Wednesday, October 1, 2014
BBQ Quilt Show and Lucky Kitty Fabric
I tried to find a flannel-backed table cloth to hang for my design wall, at BB&B, but failed miserably. BB&B does not carry them. Well, I guess it is off to Kings Variety Store in Eagle! Meanwhile, we went out to breakfast at the Original Pancake House, where they serve gluten free pancakes, and had a maaaavelous breakfast, then proceeded on down to the BBQ Quilt Show at the Fair Grounds. The quilts were wonderful and the arrangement this year had better flow and was a more relaxing experience. I got a couple new ideas. I enjoyed visiting with several friends, that I had not seen in a long time.
On Friday, my Lucky Kitty fabric from Japan arrived and it had not even been two weeks! And it is lovely and feels wonderful. I ordered a yard, but they sent me a yard and a fourth. Yeah! It will be the perfect inner border on my Aoi Has Two Sisters quilt. It washed up beautifully.

On Friday, my Lucky Kitty fabric from Japan arrived and it had not even been two weeks! And it is lovely and feels wonderful. I ordered a yard, but they sent me a yard and a fourth. Yeah! It will be the perfect inner border on my Aoi Has Two Sisters quilt. It washed up beautifully.
Saturday, September 27, 2014
Never Enough Time To Just Quilt or Sew
I did get all my Japanese blocks sewed together, but then I was waiting for the Lucky Cat fabric to arrive from Japan. My daughter helped me find this fabulous fabric on-line. I ordered it for the inside border of my quilt. It arrived yesterday. Earlier this month, I was getting ready for my daughter, and her kitty, to visit from Missouri. They arrived on the 14th and we had to give special attention to get both kitties on the track to living together. Merlinda and Ebony are both females and we think this could be a little more difficult than other combinations of cats. Ebony is staying calm, but Merlinda keeps having hissy fits. We finally have the door between them wedged open an inch. Merlinda does not want to even come down the hall to it's vicinity. We will continue taking our time. My daughter flew back to Missouri on the 21st. I really miss her. We had the most wonderful time while she was here.
The amusing thing is that when my husband saw this photo, he thought it was one of my stuffed kitty pillows! Can you see the resemblance?!!
 |
| Ebony |
 |
| I made this one in 2001. |
Thursday, September 11, 2014
What is on the Design Wall in September???
I got that little bit of doll quilt that was remaining on the design wall, last month, all pieced together. It is ready for me to quilt, but you know the story. So, all the block for my Japanese quilt are on the design wall now. I see where I need to rearrange them a little bit, then I can get down to the business of sewing them all together. This is going to be completely different from what I usually create. I have been preoccupied, these last few weeks, with yard work and getting my spare room, which is my office, cleaned up and sorted out, so it can be the personal territory of a visiting kitty cat. Ebony is my daughter's cat, and she will be staying with us for about 7 months, while my daughter is deployed overseas. I have been working out strategies to help my sweet Merlinda, the Ninja Cat, and Ebony to become acquainted with out too much fur flying. This will be interesting. If not for that (of course, I always have a reason), I would have that Japanese quilt all finished by now!! Of course!


So naturally, last weekend I took a little break from yard work and cleaning and found, in my stash, a nice piece of pink flannel with cats on it, and made a fabulous bag for a friend's un-sister. I lined it with regular cotton pink fabric. Her un-sister love's it. Yeahhhh!! That's what it is all about.
Friday, August 29, 2014
I Finished A Project!
My Mom embroidered three squares and wanted me to make a baby quilt incorporating those three squares. That was about a year ago. Well, I have finished it, and can, now, move forward without guilt. The best thing is: she really likes it and has Toni, who works at her assisted living home, in mind to give it as a gift. Toni is seven months along and is waiting to be surprised by the gender.

Tuesday, August 19, 2014
A Silly Thing Happened With the Dryer, or Design Wall Dilema!
I had a flannel-backed vinyl table cloth that I was going to wash before hanging it up as a design wall for my quilting. I finally got around to getting it washed. I tossed it in the dryer, and planned to take it out in about 1 minute. Well, I got distracted by many other things and when I remembered it was too late. The vinyl had attached itself to the back of the drum and then it twisted the table cloth into a knot. I got the table cloth out and threw it in the trash. I was able to peel all the melted vinyl off from the inside of the dryer. That is why I am continuing to use the back of my flannel kitty quilt as a design wall. I have considered putting my design wall on the pumice block chimney that is in my quilt room, but then I would have to move that mirror and my ceramic sun burst to another location, that I absolutely cannot figure out. I need the mirror to practice my violin. Also, I fly Alaska Airlines because they serve free alcoholic beverages.
Sunday, August 17, 2014
What is on the Design Wall in August?
After the quilt show, I flew off to Seattle for a few days visit with my honey. I have been determined not to have to visit any quilt shops when I am traveling. We were finding our way to the Ballard Locks to see the boats come and go and see the fish ladder. We were almost there, when my husband states, "Look, there's a quilt shop." Well, he said it, not me. So, that opened up the possibility of a visit! I said, casually, "Can we stop there on the way back?" Of course. How devine! It was The Quilting Loft, on NW Market St., in Seattle. Lovely place, and I was sooo good. I only spent $45.00 and had the most delightful visit. They have many Japanese fabrics and so much more. I bought "Aoi Has Two Sisters" and three fabrics to go with. Some of that is up on my design wall, next to my lingering scrappy doll quilt. My scrappy doll quilt has had it's beginning on the design wall for some time, but has been covered by other projects. I think one more hour on that and it will be finished. Then, the wall will be clear of Aoi and her sisters.
 |
| just a reminder, my design wall is the back of a flannel quilt, so pay no attention to all those fish! |
Saturday, August 2, 2014
Make a PVC Quilt Rack
Did you see that crazy PVC quilt rack at the Kuna Quilt Show? Wouldn't you like to make one? You can make it bigger or smaller and decorate it any way you like. That is the great thing about creativity. I am including instructions on how to make one like mine, if you read on!
SUPPLIES AND TOOLS:
 Go to your local home improvement store and you will find a nice selection of PVC pipe and connectors. I used the 1 " pipe, so I selected the elbows, T's, and end caps that were also 1". That way they all fit together. I did not use glue in my construction, yet it stays together nicely, and you can dismantle it for easy storage.

Use the elbow connectors to attach the top cross piece to both sides. The lower support cross piece will be connected by inserting it into the T connectors on both sides. Viola' ! It is done. But now you want to change it from being that lovely white color: scroll down to previous blog post.
 |
| the rack holding this small quilt is made of PVC pipe |
- hacksaw or PVC cutter tool (I used a small hacksaw)
- Sharpie marker
- measure tape
- 1 inch PVC pipe and connectors as pictured below
- your choice of colorful duct tape
As indicated, in the photo above, you need 4 each of the 5 ft lengths of PVC, and 2 elbows, 4 T's, and 4 end caps. Two of the 5 ft pieces will be cut into smaller lengths that make the vertical sides and feet. The other two 5 ft pieces will make the horizontal top piece and lower support piece.
Use the measure tape to measure 28" from the end of one long piece and mark it with a Sharpie marker. Then, from that mark, measure 12 " and mark it. Again, from that mark measure 10 " and mark. Lay the second long piece next to the piece you marked, and make the identical markings on it. You should have three marks on both 5 ' pieces of PVC. Using the hacksaw (or your PVC pipe cutter) cut at those three marked locations on both pipes (that is six cuts). Now, you have four pieces out of each of the first two of your 5 ' lengths. Lay the pieces next to each other, in two parallel straight lines. Connect the 28" piece to the 12" piece using a T connector. Insert the other end of the 12" piece into the center hole of another T connector. This is the center part of the foot support. You have two 10" pieces left and you connect them to either side of the T connector you just put on the 12" piece. You do this with both sides of the stand assembly. The end caps go on the ends of the 10" pieces that are the feet of the stand.
Now you have both sides done, and you just need the cross pieces that connect both sides. Measure and cut both cross pieces (vertical) the same length. I cut mine 31" long based on the width of my quilt. Truth is if your quilt was 27" across, you could just cut one 5' piece of PVC in half (30"), so then you would only have to purchase 3 pieces of 5' PVC.Use the elbow connectors to attach the top cross piece to both sides. The lower support cross piece will be connected by inserting it into the T connectors on both sides. Viola' ! It is done. But now you want to change it from being that lovely white color: scroll down to previous blog post.
Friday, August 1, 2014
Make That Rack Rock With Colorful Duct Tape
Cutting all that PVC was not so tough. What? Eight cuts and you are ready to assemble. Now you can add some duct tape and make that rack rock!
You need at least one roll of duct tape. You can leave negative spaces of white and really make it pop, if you use a dark color of duct tape. Just like piecing a quilt: a piece of cake! You need a cutting mat, Xacto knife or razor blade, duct tape, and your creative juices. That is all:
You need at least one roll of duct tape. You can leave negative spaces of white and really make it pop, if you use a dark color of duct tape. Just like piecing a quilt: a piece of cake! You need a cutting mat, Xacto knife or razor blade, duct tape, and your creative juices. That is all:
 |
| Once you determine the length that wraps around, you can roll it out on your cutting mat and cut at the right length every time. |
 |
| I started with two colors of duct tape and then added green peace signs and a bit of black as I proceeded, just to break up that purple and paint splash stuff. |
 |
| Experiment with adding small pieces in a mosaic fashion. |
 |
| These are the four feet that support my quilt rack. Awesome! |
Thursday, July 31, 2014

Friday, July 25, 2014


Sunday, July 20, 2014
What's on the design wall in July?
I got my Sunset Sail quilt top completed and it is hanging on my design wall. I want to keep it wrinkle free until I can take it to my long arm quilter. Yes, I am not going to quilt it myself. I have a scrappy one that is on the runway for getting quilted by me, and a few baby quilts. I will post a nice photo of this Sunset Sail once, I have it finished. Right now, Merlinda is sleeping peacefully in it's glow.

Saturday, June 28, 2014
Council, Idaho, Annual Quilt Show
I went to the Council Quilt Show today, and thoroughly enjoyed myself. They had the friendliest people there and some wonderful quilts. They, like many quilt shows, have "Challenge Blocks", but their challenge blocks have to be made to reflect the theme of the show. Their theme for 2014 is "Life on the Farm", and all the challenge blocks reflected that well. I did notice they apparently do not have a requirement on how much of the challenge material must be used in the blocks, as one with a goat only had the nostrils made from the challenge fabric. It must have been a lot of fun. They had a student category, but only two quilts entered. But what fantastic quilts they were! They were made by High School students, and they were big, like queen size, and just wonderful.
I took a photo of my most favorite quilt in the show. Quilt name is Scrappy. It was pieced by Lillian Taylor, a Hornet Creek resident, in 1957. It was hand-quilted by Sally Cole in 2014. It was stored in a barrel for 55 years after the quilt top was given to Lillian Taylor's grandson, Lee Cole, when he was 25 years old. Sally Cole saved it and finished it, and she plans to give it to one of Lillian's great-great or 3X great grand children. I love the story. It is wonderful that Sally completed this wonderful quilt.
 |
| The red & black fabric is the challenge fabric. This is the block I voted for. |
 |
| I love the old fabrics and the free-style piecing. |
 |
| Sally Cole hand-quilted each block with a diamond in a square pattern. |
Sunday, June 22, 2014
Purple Majesty
Letters sewn down, border sewn on, now I need to sandwich and quilt. I am making progress on this banner. I call it a banner, because it will be announcing the 2015 Quilt Show Theme for the Kuna Quilt Show. I am also going to make a stand to display it on. That is the part I can hardly wait for. I do so want to make that stand! Where does my passion lie?
Friday, June 13, 2014
What's On The Design Wall in June?
Lot of fabric sharing going on. That fine Robert Kaufman accounting fabric caught Cindy's eye. Teresa gave it to me. I took it to Cindy, down at the Pharmacy last Saturday afternoon. We swapped. I gave her the accounting fabric, which she is giving to her sister, and she gave me the purple majesty sky fabric for my banner at the quilt show. I am making a banner announcing the theme of the 2015 Kuna Quilt Show. The theme is "Purple Majesty." The show is in six weeks, so I got started last Saturday and have it this far by today, Friday. Yeah! Isn't that sky fabric fabulous?
 I just have to sew down the letters, add the border, sandwich, quilt, and bind. It is not so very big, so it will not be too difficult.
Tuesday, May 27, 2014
Memorial Day Weekend Bidness!
I am happy to have graduated from walker to a cane; bright orange with leopard spots, naturally! On Saturday we decorated some graves then made a brief stop at the local quilt shop for some b&w fabric for roads between my liberated house blocks! OMG! they had some Wizard of Oz fabric with Dorothy, the Scarecrow, Tinman, and the Lion, that the figures were just the right height for my liberated houses. I bought a fat quarter of that and a bit of two of the b&w fabrics. Monday afternoon, I finally got my extra flag anchor knotted onto the cord on my flag pole, and got my bigger flag up and flying. Yeah! That took me about two months to get to. Then . . . I counted how many liberated house blocks had men and how many had women and determined I was short on women, so I started on the Dorothy liberated house block. I also finished it the same evening! It is true I did purchase fabric for Dorothy to be in the doorway, but otherwise, I am trying to only use fabric I already have in my stash. I did not have any ruby slipper fabric, but I had wading boot (goolashes, Wellies, or rubber boots) fabric! I knew the Tin Man needed a heart and I have heart fabric. I wanted to use green to represent the Emerald City, but I used my avocado background Munchkin zombie fabric instead, so I guess it would be the Avocado City. Of course . . . poppies, poppies! for the roof. I went through my barn and farm fabric stash looking for those strange colored pig fabric scraps, but could not locate them, that is when I decided against the green sky and went with the yellow with barn yard animals for the background. I placed a yellow brick road at the door leading passed the tree. Note the tree and the roof are tilted because the tornado is coming!
 |
| Toto, we are not in Kansas anymore. We are in Caroland! |
Thursday, May 22, 2014
Daria's Disappearing Four Patch Nearly Finished!
The Knotty Quilters are doing a group project. I am doing Daria's blocks, and I must say they are coming along. We needed more blocks with red, so here is more red.
 |
| The top one is a finished block, just not trimmed up yet. |
Subscribe to:
Posts (Atom)